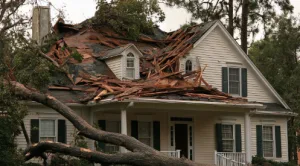
After storm roof damage, check for electrical, gas and structural hazards first, and stay off the roof. Once the property is safe, document the damage with photos and video, protect the interior, arrange professional temporary stabilization if there are active leaks, and notify your insurance company promptly. Dry wet materials within 24 to 48 hours, then compare written repair scopes before authorizing any permanent work. This national guide is for homeowners dealing with a recent storm, with a few California notes along the way. The simplest way to keep it straight: three clocks and one evidence file.
The three clocks are safety (now), moisture (24 to 48 hours), and the insurance claim and contract (promptly, but carefully). The one evidence file holds every photo, receipt, estimate and message. Keep those in mind and the rest of this falls into place when a storm leaves you with a damaged roof.
Immediate Steps: Prioritize Safety Before You Inspect Any Damage
The safety clock runs now. Before you think about documentation or contractors, make sure the building is safe to approach and occupy. The CDC advises people to stay out of structures with visible damage such as downed power lines, fallen trees, wall cracks or foundation movement until a professional has assessed them. OSHA notes that roof inspection and tarping carry fall, ladder, electrical and deteriorated-surface hazards, which is exactly why close roof work belongs to properly equipped crews, not homeowners. Severe weather can weaken a structure in ways that aren’t visible from the yard, so these immediate steps come first and the safety concerns always outrank everything else.
Walk the perimeter from the ground and watch for these hazards:
- Downed or sagging power lines, or anything touching an energized line.
- A gas smell or a hissing sound near the home.
- A tree or heavy limb resting on the structure.
- A sagging roofline or ceiling, or visible shifting.
- Water pooling near wiring, outlets, panels or light fixtures.
- Cracking, popping or shifting sounds from the framing.
- Smoke, sparks or a burning smell.
Leave the area and call emergency services if a tree is on the house, the roof or ceiling is sagging, you hear structural movement, you smell gas, or you see downed power lines or active leaks near electrical fixtures. Do not switch electricity on or off while standing in water, and do not re-energize a wet electrical system until an electrician has checked it. Never use an open flame if gas may be present.
Stay off the roof entirely. A surface that looks fine from the driveway can be wet, loosened or structurally weakened after high winds, and a fall from height is the most common serious injury in this situation. Everything you need to document can be captured from the ground or through a window. A little emergency supplies kit with flashlights, batteries and plastic sheeting makes this early stage easier.
Document Damage With Photos and Videos From Ground Level
Start your evidence file the moment the property is safe to approach. Create one dedicated folder on your phone or computer and put everything in it: photos, video, notes, receipts, estimates and copies of messages. Insurance regulators, including the California Department of Insurance, consistently recommend you document damage before any debris removal, make only reasonable temporary repairs, save receipts and keep a record of every conversation. Thorough photo documentation early on can make a significant difference once the claim is underway.
Work through this checklist to document damage, all from ground level or a window:
- Wide shots of every roof slope visible from the ground, plus all four sides of the house.
- Zoom shots (use your camera’s zoom, not a ladder) of missing shingles, exposed decking and displaced flashing.
- Fallen shingles, tiles or metal pieces where they landed in the yard.
- Any hailstones, photographed next to a coin or ruler so the size is clear.
- Fallen trees and large branches before removal, if they can safely stay put for now.
- Dented gutters, downspouts, vents and other soft-metal parts.
- Damage to siding, windows, fascia, soffits and exterior equipment.
- Interior ceiling water stains, active drips, wet insulation, and damaged furniture or flooring.
- A short walkthrough video that connects the exterior damage to the interior leaks.
Write down the storm event’s date, approximate time, and any local severe weather warnings that were issued. Keep a contact log with names, dates and what was said for the insurance company, the insurance adjuster, any contractors and the building department. Hold onto receipts for tarps, water removal, temporary lodging and anything else you spend on mitigation. This kind of comprehensive documentation makes the whole repair process smoother later.
Resist the urge to throw out damaged materials or torn-off pieces too quickly. A pile of hail-dented metal or cracked tile is evidence of hail damage, and once it’s in the trash it’s gone. If something has to be moved for safety, photograph it first.
Prevent Additional Damage Without Climbing on the Roof
Your insurance company expects you to take reasonable steps to prevent additional damage, and most policies cover sensible temporary measures. A tarp is stabilization, not a repair, and the distinction matters. Temporary mitigation buys time and limits water intrusion while you document the loss and wait for guidance. These temporary mitigation steps help you avoid permanent repairs that haven’t been inspected yet. Permanent repairs come later, after a professional roof inspection. Acting quickly here helps protect your home from further damage while heavy rainfall is still a threat.
Inside the home, you can do the safe work yourself:
- Move furniture, electronics and valuables away from active leaks.
- Place buckets or bins under drips and empty them before they overflow.
- Cover unaffected belongings with plastic sheeting.
- Cover broken windows from the inside to slow wind-driven rain.
- Clear loose debris from walkways where it’s safe to reach.
The roof itself is a different matter. Covering exposed areas of decking or a torn section means working on a wet, steep or potentially weakened surface, often near the electrical mast or power drop. That’s professional emergency repairs and tarping work. Keep away from any standing water that could be in contact with wiring, and never run power cords or electrical equipment through wet areas. Stay well clear of any downed power lines in the yard until the utility confirms they are de-energized.
Save every receipt tied to these temporary repairs. Insurers often want documentation showing the measure was reasonable and necessary, and that paper trail supports reimbursement later as part of your insurance claim. Photograph the tarp or covering once it’s in place so the record shows what was done and when, which also helps prevent additional damage from going undocumented. Tarping exposed areas is a stopgap that limits water intrusion until a crew can return for a lasting fix.
Work Against the 24-48-Hour Moisture Clock
Once water gets inside, a second clock starts. The EPA recommends drying water-damaged areas and belongings within 24 to 48 hours where possible to reduce the chance of mold growth. Past that window, drywall, insulation and flooring hold moisture that becomes harder and more expensive to deal with. Heavy rain driven through a damaged roof can soak materials faster than you’d expect, and lingering water intrusion feeds hidden rot behind walls.
Work through the interior spaces methodically. Extract standing water where it’s electrically safe to do so, run dehumidifiers and fans to pull moisture out of the air, and open up wet assemblies so they can dry. Wet drywall, insulation and carpet trap water against framing, so these affected areas need attention fast. Check upper floors and ceilings below the leak, since that’s where secondary damage and further damage tend to spread quietly.
Know when the job is bigger than a shop vacuum and a fan. Bring in water-remediation professionals if the interior damage is extensive, if the water is contaminated, if you suspect hidden moisture inside walls, or if mold has already taken hold. Trying to dry a saturated ceiling cavity with a box fan usually just hides the problem until it resurfaces.
Schedule a Professional Roof Inspection Before Permanent Repairs
With the home safe and the interior drying, the next step is a qualified professional roof inspection. This is where hidden storm damage surfaces: broken seals, bruised shingles, cracked flashing and compromised underlayment that aren’t obvious from the ground. A licensed roofing contractor uses proper fall protection and safety equipment to get up close, which is the whole reason you didn’t. This is also where early structural issues get caught before they grow.
A useful inspection produces a written report, not just a verbal pitch. Ask that it include:
- Photographs of each affected slope and component.
- A list of the specific areas and parts that are damaged.
- The roof material type and its general condition.
- An honest assessment of whether the damaged roof is repairable.
- Any recommended temporary measures to protect the structure.
- A written scope describing the proposed work.
Hold off on making permanent repairs until this inspection is done and, in most cases, until your insurance company has given instructions. Permanent work before you document damage can muddy a claim and sometimes has to be redone. Bay Area homeowners who need a professional roof inspection or emergency repairs can compare local providers, including Symplify Roofing, and request a written photo report before authorizing permanent work. Whichever company you consider, verify its license, insurance and references independently rather than taking any single report at face value.
What a Hail Storm and Other Storm Damage Looks Like on Different Roofs
Storm damage shows up differently depending on what’s on your roof. Some signs are visible damage you can spot from the yard; others need a trained eye. A hail storm is a good example, and it’s common. The National Weather Service Storm Prediction Center recorded 5,432 hail events involving stones at least one inch in diameter across the U.S. in 2025, up slightly from 5,373 in 2024. States like Nebraska sit among the leaders for hail claims year after year. If you collected any hailstones after a hail storm, their size helps an inspector gauge the likely impact and confirm hail damage, especially when hail damaged shingles show fresh impact marks.
Asphalt shingles
- Missing shingles or ridge caps, lifted or creased tabs.
- Cracks, punctures or exposed underlayment.
- Fresh granule piles near downspouts, or hail bruising on gutters, flashing and vents.
- Shingles that look intact but no longer seal, which usually needs a close inspection to confirm.
Tile or slate
- Cracked, broken or displaced units.
- Missing ridge or hip pieces.
- Loose fragments in gutters or on the ground, and damage around flashings and penetrations.
Metal roofing
- Displaced panels or trim, open seams and loosened fasteners.
- Punctures from flying debris.
- Coating damage that can expose bare metal to corrosion, and lifted edges around corners and perimeters.
Low-slope and membrane roofing
- Tears, punctures or open seams, and lifted perimeter flashing.
- Displaced rooftop equipment or penetrations.
- New ponding or blocked drainage after the storm.
Inside, watch for new ceiling or upper-wall stains, damp insulation, daylight visible through the roof deck, musty odors, and bulging or sagging ceilings. Water around lights or outlets is both a sign of roof damage and a safety issue. Damaged flashing, vents and dented gutters deserve their own look, since those are frequently the first place roof leaks start after a storm.
File Your Insurance Claim and Understand Your Insurance Policy
This is the claim and contract clock: move promptly, but don’t rush decisions. Contact your insurance provider to report the loss once the property is safe, and ask the right questions before signing anything.
Start with how your insurance policy pays. With replacement cost value (RCV), depreciation generally isn’t deducted from the covered replacement cost, subject to policy terms and limits. With actual cash value (ACV), depreciation is deducted. Some policies cover most of the house at RCV but settle the roof differently, which is why your declarations page and endorsements matter. The NAIC and the California Department of Insurance both stress reading these terms carefully rather than assuming.
Work through questions like these with your insurance company:
- Is wind or hail damage covered, and is there a separate wind, hail or named-storm deductible?
- Is the roof settled at RCV or ACV, and is there an age-based payment schedule?
- Does the insurance policy cover reasonable emergency mitigation and emergency repairs?
- Is additional living expense coverage available if the home is unsafe to occupy?
- Does the insurer require an inspection before permanent repairs?
- What reporting, proof-of-loss and repair deadlines apply?
Flood and storm-surge damage generally require separate flood coverage, so wind-driven rain and rising water are treated very differently. Many insurers suggest reporting your insurance claim within about 30 days, but deadlines vary, so check your own insurance policy’s reporting and proof-of-loss terms rather than relying on a number you read online. An insurance adjuster will typically inspect the loss, often within a couple of weeks, and apply the policy to your claim. Many homeowners find the claims process easier when they keep their documentation ready from day one.
Keep the roles straight. You report the loss and choose the contractor. The roofing contractor documents physical conditions and proposes a scope. The insurance adjuster values the loss for the insurer. A public adjuster, where licensed, can represent you on claim valuation. The building department sets permit and code requirements. A roofer can document what work is needed and guide you through the repair process, but a roofer cannot “make the insurance company pay,” and anyone promising that should give you pause.
Check the Rest of the Exterior Surfaces for Storm Damage
Wind and hail rarely stop at the roof. The same storm that lifted shingles likely dented gutters, cracked siding, split fascia or damaged soffits and vents across the exterior surfaces. Document damage across the whole exterior while you’re at it, because any visible damage you miss now often turns into a dispute or a surprise later. A proactive approach to the full exterior keeps small problems from being overlooked.
Photograph gutters and downspouts, fascia and soffits, siding, windows, roof and wall vents, and any rooftop equipment. When you gather estimates, make sure each written scope separates the components clearly so the roof work, gutter work and siding work are each spelled out. In the Sacramento area, exterior contractors such as Cobex Construction Group can be considered when a storm affects the roof together with gutters, fascia, siding or other exterior components; working with a contractor familiar with the local permit process and your specific roof configuration helps, and the written scope should distinguish each repair clearly. As always, verify licensing and insurance independently before hiring.
Repair or Replace? Making the Right Call
This is a condition-based decision, not an insurance-driven one. Missing shingles don’t automatically mean a full replacement, and a “percentage damaged” rule you find online doesn’t settle it either.
Repair tends to make sense when the storm damage is genuinely localized, the surrounding material is still serviceable, matching shingles or materials are available, and the deck and underlayment are sound. If a code-compliant, warrantable repair is realistic, repairing is often the practical choice.
Replacing the entire roof tends to make more sense when the roof damage spans multiple slopes or large areas, the deck or structure shows structural damage, or the roof was already near the end of its life. Brittle materials that crack when you touch them, shingles you simply can’t match anymore, local code that limits recovering an old roof, or unresolved flashing, ventilation and drainage problems all push toward replacement.
The 2024 International Residential Code includes provisions for roof replacement, recovering, flashings and reuse of existing materials, but jurisdictions adopt and amend model codes on their own timelines. Your local building department is the authority on what applies to your home. Weigh the long-term cost, not just the insurance outcome: a cheap patch on a worn-out roof can cost more over a few years than doing it right once.
How to Choose a Contractor Without Being Pressured
The contractor you pick shapes everything that follows, and the pressure to decide fast is usually a sales tactic, not a real deadline. The CFPB recommends comparing bids, verifying licenses and insurance, confirming who pulls permits, and keeping signed contracts, warranties and payment records.
Screen candidates against this checklist:
- Verify the current license or registration where your state requires one.
- Confirm general liability and workers’ compensation coverage.
- Look for a stable local address and recent local references.
- Get two or three written estimates for major work.
- Ask whether emergency repairs and tarping are priced separately from permanent repairs.
- Require a written scope covering tear-off, underlayment, flashing, ventilation, fasteners, disposal and cleanup.
- Ask for the unit price if unexpected decking replacement comes up.
- Establish who obtains permits and schedules inspections.
- Get written product and workmanship warranty terms.
- Tie progress payments to completed work and delivered materials, put every change in a signed change order, and never pay in cash or make the final payment before the job is done right.
Storm-chaser red flags. Walk away from an unsolicited inspection that immediately claims major storm damage, a “free roof” or “no deductible” promise, pressure to sign before another contractor or the insurance company can look, blank spaces in the contract, large cash demands, or a request to endorse your entire insurance check on the spot. Refusal to share a license number, insurance certificate or references is a clear signal, and so is a contract that quietly transfers your insurance claim rights or guarantees the insurer will pay for a full replacement.
California note. The CSLB advises verifying a contractor’s license and limits a home-improvement down payment to 10% of the contract price or $1,000, whichever is less, aside from a rare bonded exception. Contractors holding an active C-39 roofing classification must carry workers’ compensation insurance or approved self-insurance.
If You Replace, Build the Next Roof Stronger
A replacement is a chance to make the next roof handle severe weather better than the last one. IBHS’s FORTIFIED Roof approach combines a sealed roof deck, enhanced deck attachment and reinforced roof edges. IBHS states that a properly installed sealed roof deck can reduce water entry through a roof that has lost its outer covering by as much as 95 percent, which is a meaningful buffer when a future storm strips the shingles and heavy rain follows.
Worth discussing with your contractor: a sealed roof deck, improved deck fastening, reinforced drip edges and fully adhered starter strips, wind-rated coverings installed to manufacturer spec, and wind- and rain-resistant attic vents. Where a hail storm is a real hazard, impact-resistant materials make sense; UL 2218 rates them Class 1 through 4, with Class 4 the most resistant. Have hidden work like deck attachment and underlayment photographed before it’s covered, so you have a record of what’s under the surface. Then schedule regular inspections going forward to catch small problems and protect your home before the next storm finds them. This kind of forward planning smooths the whole recovery process after any future storm.
Post-Storm Roof Damage Checklist
- Safety clock (now): Check for downed power lines, gas, trees on the home, sagging rooflines and water near wiring. Leave and call for help if the structure is unstable. Stay off the roof unless it is safely accessible to a qualified crew.
- Moisture clock (24-48 hours): Move belongings, catch leaks, cover broken windows, extract water where safe, and dry wet materials to prevent interior damage. Call remediation pros for extensive or contaminated water.
- Claim and contract clock (promptly, carefully): Notify the insurance company, schedule a professional roof inspection, understand ACV versus RCV and your deductible, check the whole exterior, and compare written scopes before authorizing permanent work.
- Evidence file: Keep all photos, video, receipts, estimates, the inspection report and every message in one place so you can document damage step by step from start to finish.
Frequently Asked Questions
How long does a roof tear-off take?
For an average home, a tear-off and replacement usually takes one to two days, depending on the roof’s size, the number of existing layers and the weather. Larger or more complex roofs, or runs of severe weather, can stretch that out.
What should I do if my roof collapses?
Evacuate everyone immediately and shut off utilities only if you can reach them safely. Call emergency services and do not re-enter the building. Once you’re at a safe distance, notify your insurance company and document what you can see without going back inside.
How can I get my roof repaired if I have no money?
A covered insurance claim may pay for storm damage, and reimbursement for documented mitigation receipts can help in the meantime. Many contractors offer payment plans. Document damage first and confirm your coverage before assuming you’ll be paying out of pocket.
What if it rains while my roof is being replaced?
Reputable contractors use water-resistant underlayment and tarps to protect exposed areas overnight and during breaks in the work, which keeps heavy rain from causing further damage mid-job. Ask for the weather-protection plan in writing as part of the scope so you know how open sections will be covered.